
Recently, OpenSearch implemented connectors, a functionality that enables connecting a machine learning model without the need to internally deploy it to the cluster. In this blog article we will discover how to use connectors and implement a rag through the utilization of connectors and agents.
In today’s rapidly evolving search engine landscape, machine learning has a crucial role in shaping the way we look for informations. OpenSearch and Elasticsearch have seamlessly integrated modern machine learning techniques for several years now, marking a signficant evolution in how we perform different task, from simple search to NLP more complex task, such as classification and Named Entity Recognition.

As Elasticsearch, also OpenSearch offers a functionality of model management. This allows to upload and deploy our models internally to our cluster, as discussed in a previous blog’s article “NLP dans OpenSearch”.
This functionality is immensely powerful yet limited, as we’re unable to deploy any model we desire; instead, we are bound to adhere to strict compatibility requirements.
Moreover, with the release of version 2.9, OpenSearch unveiled connectors, opening up exciting possibilities. Let’s explore them together.
Connectors allow us to connect any model deployed on a third-party machine learning platform to the cluster without the need for internal deployment. By default, OpenSearch provides connectors for several platform, such as Amazon SageMaker, Openai, Cohere and Amazon Bedrock, but we can also create our own, as we will see in the next chapter.
For now let’s concentrate on default connectors. In this example, we will see how to connect and use ada embedding model from OpenAi.
First, it’s necessary to activate connectors by updating the cluster settings:
PUT /_cluster/settings
{
    "persistent": {
        "plugins.ml_commons.connector_access_control_enabled": true
    }
}
Once this is done, we can use a standard blueprint to create our connector. In this example we are going to use OpenAI ADA default connector blueprint:
POST /_plugins/_ml/connectors/_create
{
    "name": "embedding_ada",
    "description": "My connector to create embedding using ada model",
    "version": "1.0",
    "protocol": "http",
    "parameters": {
        "model": "text-embedding-ada-002"
    },
    "credential": {
        "openAI_key": "<PLEASE ADD YOUR OPENAI API KEY HERE>"
    },
    "actions": [
        {
        "action_type": "predict",
        "method": "POST",
        "url": "https://api.openai.com/v1/embeddings",
        "headers": {
            "Authorization": "Bearer ${credential.openAI_key}"
        },
        "request_body": "{ \"input\": ${parameters.input}, \"model\": \"${parameters.model}\" }",
        "pre_process_function": "connector.pre_process.openai.embedding",
        "post_process_function": "connector.post_process.openai.embedding"
        }
    ]
}
Note that we are associating the action ‘predict’ with an endpoint, which corresponds to the OpenAI embedding endpoint. The parameters specified in the request_body objects are either specified at the level of the connector, like the parameters.model, either during the call to the predict, like in the case of the parameters.input.
Once this is done, OpenSearch dashboard will return the connector id:
{
    "connector_id": "OyB0josB2yd36FqHy3lO"
}
Use the connector id to register the model, just like this:
POST /_plugins/_ml/models/_register
{
    "name": "OpenAI embedding model",
    "function_name": "remote",
    "description": "test model",
    "connector_id": "OyB0josB2yd36FqHy3lO"
}
OpenSearch dashboard will then return the task_id, its state and the model_id.
{
    "task_id": "E-6oOI8BPOcrd1NgZ5nk",
    "status": "CREATED",
    "model_id": "FO6oOI8BPOcrd1NgaJkd"
}
Finally we can test the model using the predict api and the model_id, as specified inside the connector:
POST /_plugins/_ml/models/FO6oOI8BPOcrd1NgaJkd/_predict
{
    "parameters": {
        "input": [ "What is the meaning of life?" ]
    }
}
Another common use case of connectors is to employ our own model. In this scenario, there is no default blueprint, and it’s up to us to create one.
For this example, we will utilize a remotely deployed Hugging Face model while implementing a full Open-Source RAG (Retrieval-Augmented Generation). This will enable us to utilize custom connectors, gain insight into RAG, and learn how to implement it using agents. Additionally, we will revisit embedding generation through a locally deployed model (despite we are not obliged to use vector search for rag, since we can rely on classic lexical search).
Our RAG’s architecture is going to look like this:
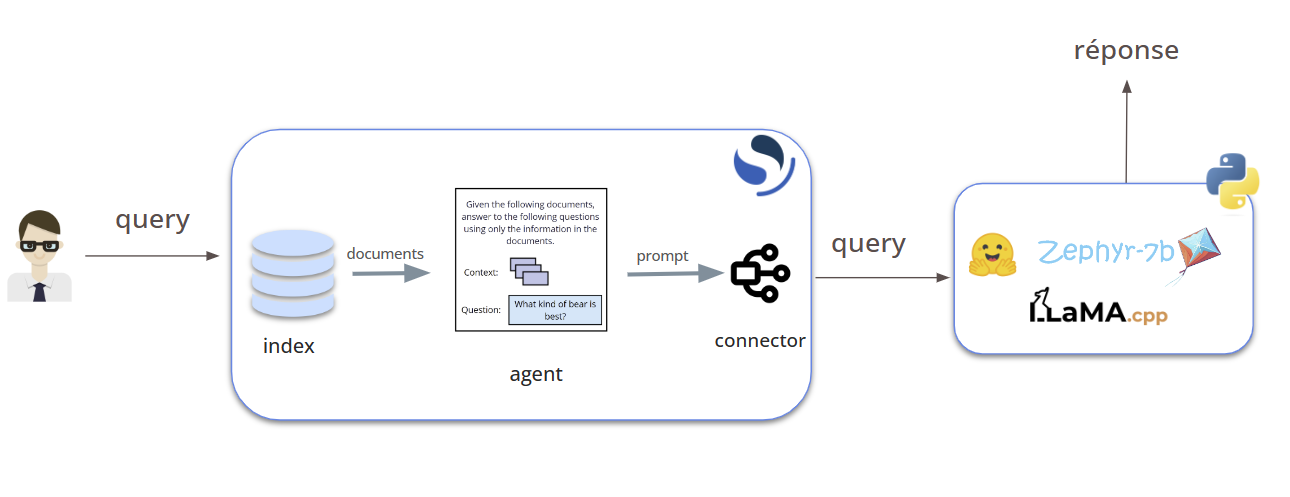
If you want to learn more about RAG, you can follow our article: A guide to a full Open-Source RAG.
Enough chatter, let’s dive into the process:
First it’ll be necessary to prepare our cluster:
PUT /_cluster/settings
    {
    "persistent": {
        "plugins.ml_commons.memory_feature_enabled": true,
        "plugins.ml_commons.rag_pipeline_feature_enabled": true,
        "plugins.ml_commons.agent_framework_enabled": true,
        "plugins.ml_commons.only_run_on_ml_node": false,
        "plugins.ml_commons.connector_access_control_enabled": true
    }
}
In this case, some options are not mandatory. For example, the memory_feature enable rag conversational feature: the large language model will remember the conversation history in order to give more accurate and relevant answer. Another option that is not mandatory, but necessary in case you have a cluster with no machine learning node, is only_run_on_ml_node.
Secondly, we need to update the trusted endpoint list. In this case, I am adding a regex that allows all types of endpoints. However, it is a good practice to use a more restrictive regex to allow only endpoints specific to your use case.
PUT /_cluster/settings
{
    "persistent": {
        "plugins.ml_commons.trusted_connector_endpoints_regex": [
        "^https://runtime\\.sagemaker\\..*[a-z0-9-]\\.amazonaws\\.com/.*$",
        "^https://api\\.openai\\.com/.*$",
        "^https://api\\.cohere\\.ai/.*$",
        "^https://bedrock-runtime\\..*[a-z0-9-]\\.amazonaws\\.com/.*$",
        ".*"
        ]
    }
}
Let’s register and deploy our embedding model, that we will use to create vectors from our data in order to perform vector search.
POST /_plugins/_ml/models/_register?deploy=true
{
    "name": "huggingface/sentence-transformers/all-MiniLM-L12-v2",
    "version": "1.0.1",
    "model_format": "TORCH_SCRIPT"
}
Once we have prepared the embedding pipeline and our index (you can find more about how to do it: NLP in OpenSearch), it’s time to prepare our connector:
POST /_plugins/_ml/connectors/_create
{
    "name": "Llama_CPP Chat Connector",
    "description": "The connector to my own Llama_CPP models",
    "version": 5,
    "protocol": "http",
    "parameters": {
    "endpoint": "Your address"
},
"actions": [
    {
    "action_type": "predict",
    "method": "POST",
    "url": "${parameters.endpoint}/chat",
    "request_body": "{ \"message\": \"${parameters.message}\" }"
    }]
}
Once we got our connector_id, it’s time to register our model:
POST /_plugins/_ml/models/_register
{
    "name": "zephyr-7b",
    "function_name": "remote",
    "description": "test model",
    "connector_id": "XhoFSY8BAdMqvSY3Teue"
}
We can now use the model_id to deploy the model:
POST /_plugins/_ml/models/YxoFSY8BAdMqvSY3butu/_deploy
Finally, we can use a machine learning agent (available from the version 2.13) to couple the retrieval phase, using vector search, and the large language model. We are going to use this last part to define the prompt.
POST /_plugins/_ml/agents/_register
{
"name": "Test_Agent_For_RAG",
"type": "flow",
"description": "this is a test agent",
"tools": [
    {
    "type": "VectorDBTool",
    "parameters": {
        "model_id": "s7Ay4Y4BFgAnzku3kwJC",
        "index": "my_test_data",
        "embedding_field": "embedding",
        "source_field": ["text"],
        "k":1,
        "input": "${parameters.question}"
    }
    },
    {
    "type": "MLModelTool",
    "description": "A general tool to answer any question",
    "parameters": {
        "memory_id": "kF72SI8BwKcdGeEaycUI",
        "model_id": "YxoFSY8BAdMqvSY3butu",
        "message": "This is your context:\n${parameters.VectorDBTool.output}\n This is your question:${parameters.question}\n Give an answer based on the context.",
        "response_field": "result"
    }
    }
]
}
To test the RAG system, just execute the rag agent, using the agent_id. For example:
POST /_plugins/_ml/agents/ahoHSY8BAdMqvSY3ouuD/_execute
{
  "parameters": {
    "question": "what's the population increase of Seattle from 2021 to 2023"
  }
}
In conclusion, the advent of connectors in OpenSearch marks a significant milestone in simplifying the integration of machine learning models with the platform. Through connectors, users can seamlessly connect third-party machine learning models without the need for internal deployment, expanding the horizon of possibilities for leveraging machine learning in search applications.